Microscopy, Staining & the Microbiology Lab
The organisms you spent Chapter 1 meeting share one inconvenient trait: not one of them can be seen with the naked eye. Every practical thing microbiology does — identifying the bug in a wound, choosing the right antibiotic, confirming that a sterilizer worked — begins with a way to make the invisible visible. This chapter is about that toolkit: the units we use to measure things a thousand times smaller than a grain of salt, the microscope that magnifies them, the dyes that give them color and reveal their secrets, and the lab workflow that turns a swab from your patient into a culture-and-sensitivity report you can act on. Master this chapter and a lab result stops being a mystery and starts being a set of instructions.
By the end of this chapter you can
- State the metric units used to measure microbes and place bacteria, viruses, and human cells on the size scale.
- Explain why the unaided eye cannot resolve a bacterium.
- Name the major parts of a compound light microscope and describe what each does.
- Distinguish magnification from resolution, and explain the role of the oil-immersion lens.
- Explain why cells must be stained, and contrast simple, differential, and negative stains.
- Walk through the four steps of the Gram stain and explain what makes a cell Gram-positive or Gram-negative.
- Trace a specimen from collection through culture, colony, identification, and sensitivity testing.
- Describe the nurse's role in specimen collection and in reading a culture-and-sensitivity report.
Section 1Why microbes are invisible
The metric ladder
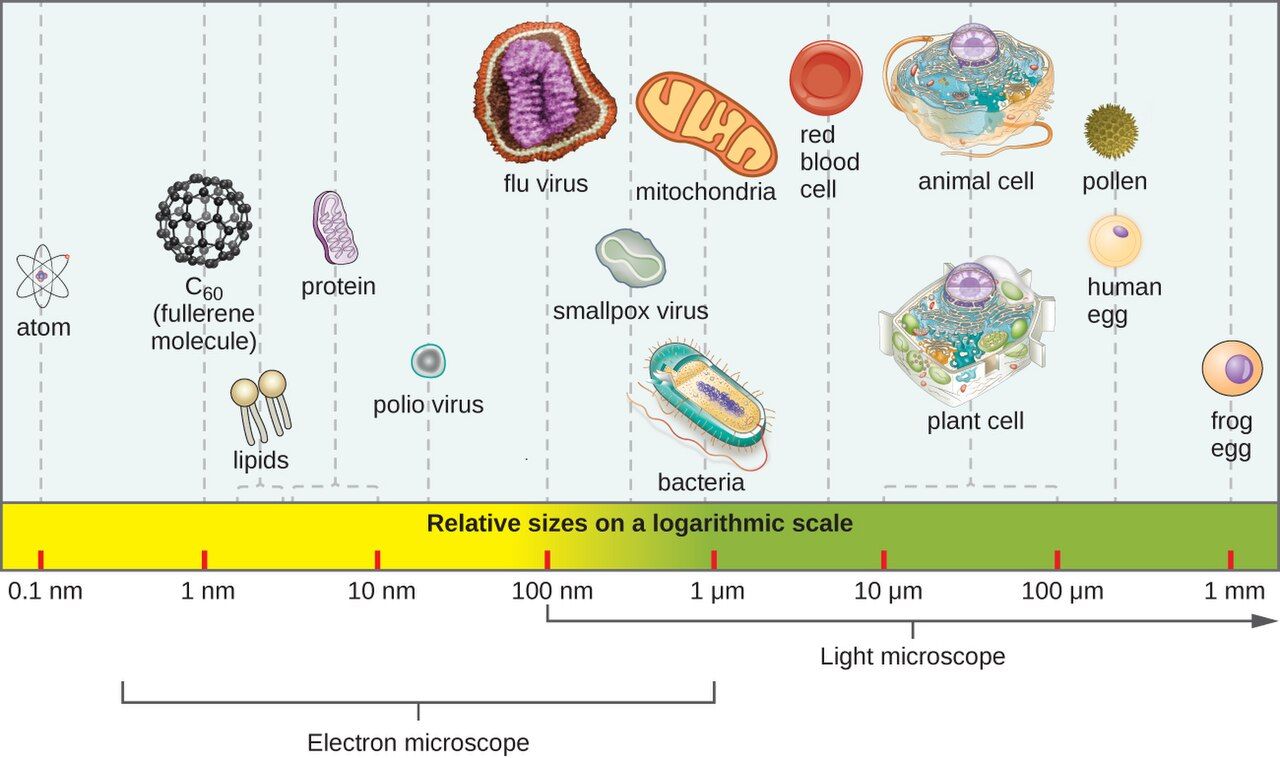
Microbiology runs on the metric system, and the whole subject makes more sense once the units are second nature. Start with the meter and divide by a thousand at each step: a millimeter (mm) is a thousandth of a meter, a micrometer (µm, sometimes called a micron) is a thousandth of a millimeter, and a nanometer (nm) is a thousandth of a micrometer. Each rung down is 1000 times smaller than the one above it. You already live at the millimeter scale — the smallest lines on a ruler are about a millimeter apart. Microbes live one or two rungs below that, in a world your eye was never built to enter.
How big is a microbe, really?
A useful benchmark is the red blood cell, roughly 7 µm across. Most bacteria are smaller still — a typical rod is about 0.5 µm wide and 2–3 µm long, and a round coccus is around 1 µm. Yeasts and protozoa, being eukaryotes, run larger, from several to tens of micrometers. Viruses are in a different league altogether, measured in nanometers: most fall between 20 and 300 nm, so dozens of them — and up to roughly a hundred of the smallest — could line up across a single bacterium. This is why viruses were invisible even to early microscopists and why we needed the electron microscope to see them at all.
| Unit | Size | What lives here |
|---|---|---|
| Millimeter (mm) | 1/1000 of a meter | The smallest thing the naked eye resolves (about 0.1 mm) |
| Micrometer (µm) | 1/1000 of a mm | Human cells (~10–100 µm), red blood cells (~7 µm), bacteria (~1–3 µm) |
| Nanometer (nm) | 1/1000 of a µm | Viruses (~20–300 nm), large molecules, ribosomes |
Why your eye can't see them
The human eye can separate two points only if they are roughly 0.1 mm (100 µm) apart — anything closer blurs into a single dot. A bacterium at 1 µm is about a hundred times below that limit, so it simply cannot register, no matter how good your eyesight or how bright the light. This is not a matter of things being faint or far away; it is a hard physical limit called resolution, and defeating it is the entire job of the microscope you will meet in the next section.
- Metric ladder: 1 mm = 1000 µm, and 1 µm = 1000 nm — each step is 1000× smaller.
- Most bacteria are ~1–3 µm; viruses are ~20–300 nm; a red blood cell (~7 µm) is a handy benchmark.
- The naked eye resolves only to about 0.1 mm — roughly 100× too coarse to see a bacterium.
- Because microbes are invisible individually, the lab grows them into visible colonies before it can work with them.
Section 2The light microscope
The parts and what they do
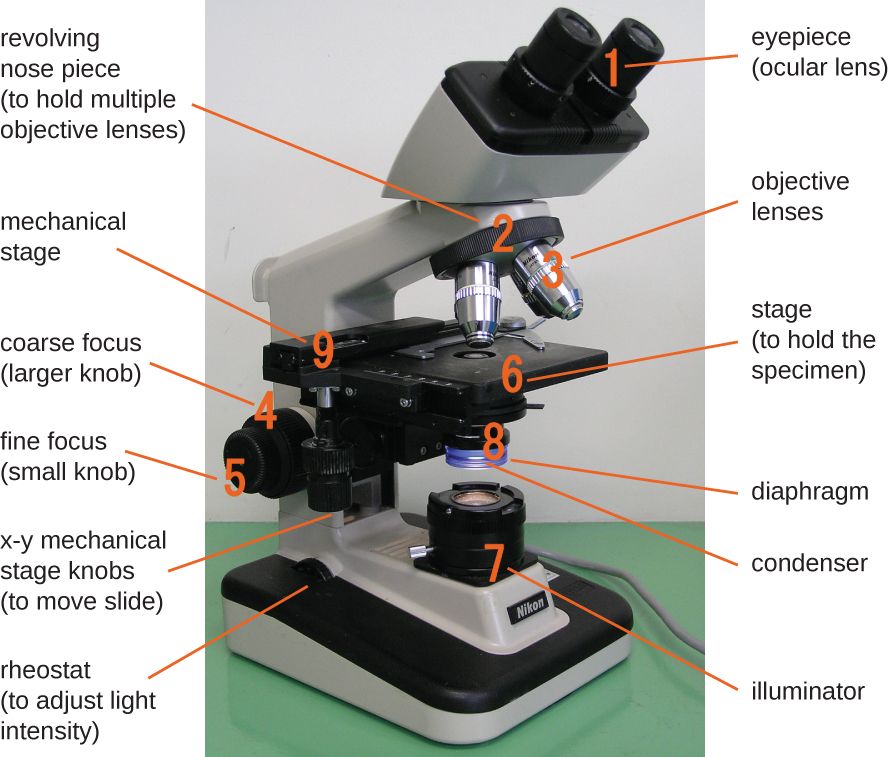
The workhorse of every clinical lab is the compound light microscope — "compound" because it uses two lens systems in series to build up its magnifying power. Light starts at the illuminator in the base and travels upward. The condenser gathers and focuses that light onto the specimen, and the iris diaphragm adjusts how much passes through, which controls contrast. The specimen sits on the stage. Above it, the objective lenses — mounted on a rotating nosepiece — do the first stage of magnifying, and the ocular (eyepiece) you look through does the second. The coarse and fine focus knobs raise and lower the stage until the image is sharp.
Magnification: stacking two lenses
Total magnification is simply the ocular multiplied by the objective. Oculars are almost always 10×. Objectives come in a standard set: scanning (4×), low power (10×), high-dry (40×), and oil-immersion (100×). So with the 10× ocular, the oil-immersion objective gives 10 × 100 = 1000× total magnification — enough to see bacterial shape and arrangement clearly. You almost always find your target on a low-power objective first, center it, then rotate up to higher power.
| Objective | Objective power | With 10× ocular | Typical use |
|---|---|---|---|
| Scanning | 4× | 40× | Find the specimen, survey the slide |
| Low power | 10× | 100× | Larger cells, general orientation |
| High-dry | 40× | 400× | Fungi, cells, parasites |
| Oil immersion | 100× | 1000× | Bacteria — Gram stains, cell arrangement |
Resolution is what really matters
Beginners chase magnification, but the property that decides whether an image is useful is resolution — the smallest distance between two points that still lets you see them as separate. Magnifying a blurry image just gives you a bigger blur (lab staff call this empty magnification). The resolution of a light microscope is capped near 0.2 µm by the wavelength of visible light itself — you cannot resolve two things closer than about half a wavelength apart. That 0.2 µm limit is good enough to see bacteria but not viruses, which is exactly why viruses need an electron microscope. To squeeze the best resolution out of the 100× lens, we add a drop of immersion oil between the slide and the objective. Oil has the same light-bending (refractive) index as glass, so it keeps light rays from scattering away as they leave the slide, funneling more of them into the lens and sharpening the image.
- The compound light microscope uses two lenses; light travels illuminator → condenser → specimen → objective → ocular.
- Total magnification = ocular × objective; the 10× ocular with the 100× oil lens gives 1000×.
- Resolution (~0.2 µm for light) — not magnification — determines how much real detail you see.
- Immersion oil matches the refractive index of glass, capturing more light rays and improving resolution at 100×.
Section 3Why we stain
The contrast problem
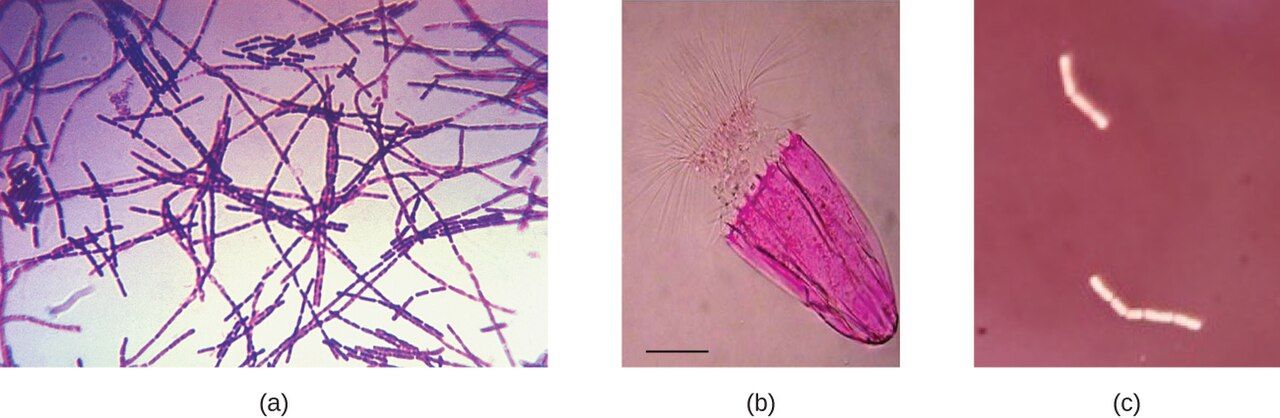
Living cells are mostly water and nearly transparent, so under an ordinary light microscope they are almost invisible against a bright background — there just isn't enough contrast to make out shape or structure. Staining solves this by coating the cell in colored dye. Before you can stain a bacterial slide, you make a smear: spread a thin film of the sample on a slide, let it air-dry, then pass it through a flame or warm it to heat-fix it. Fixing does three jobs — it kills most of the organisms, glues them to the glass so they don't rinse off, and preserves their shape. Note that heat-fixing is not sterilization: it kills most vegetative bacteria, but mycobacteria and bacterial endospores can survive it. Most bacterial dyes are basic (positively charged) dyes — methylene blue, crystal violet, safranin — because the bacterial cell surface carries a negative charge that attracts them.
Simple stains
A simple stain uses a single dye to add color and contrast. It tells you a cell's size, shape, and arrangement — whether the organism is a round coccus or a rod-shaped bacillus, and whether it forms clusters, chains, or pairs — but nothing more. It's fast and it's the right tool when all you need is to confirm that organisms are present and see their basic morphology.
Differential and special stains
A differential stain uses more than one reagent to divide bacteria into groups based on how they react. The two you must know are the Gram stain (the entire next section) and the acid-fast stain, which singles out the waxy-walled organisms like Mycobacterium tuberculosis that a Gram stain misses. Special stains go after one specific structure — capsule stains, endospore stains, flagella stains. Many of these use negative staining, in which an acidic dye like India ink colors the background and leaves the cell unstained and glowing against it. Negative staining skips heat-fixing, so it doesn't distort delicate cells or shrink a capsule, which is why it's the go-to for capsules and for fragile organisms.
| Stain type | Reagents | What it tells you | Example |
|---|---|---|---|
| Simple | One dye | Size, shape, arrangement | Methylene blue |
| Differential | Two or more reagents | Sorts cells into groups | Gram stain, acid-fast stain |
| Special | Structure-specific | Reveals one feature | Capsule, endospore, flagella |
| Negative | Acidic dye (stains background) | Shape without distortion; capsules | India ink, nigrosin |
- Cells are nearly transparent; staining adds the contrast needed to see shape and structure.
- A smear is air-dried and heat-fixed — killing most vegetative organisms, fixing them to the slide, and preserving shape; it does not sterilize.
- Simple stains (one dye) show morphology; differential stains (multiple reagents) sort cells into groups.
- Negative staining colors the background and avoids heat, so it's ideal for capsules and fragile cells.
Section 4The Gram stain
What makes a cell Gram-positive or Gram-negative
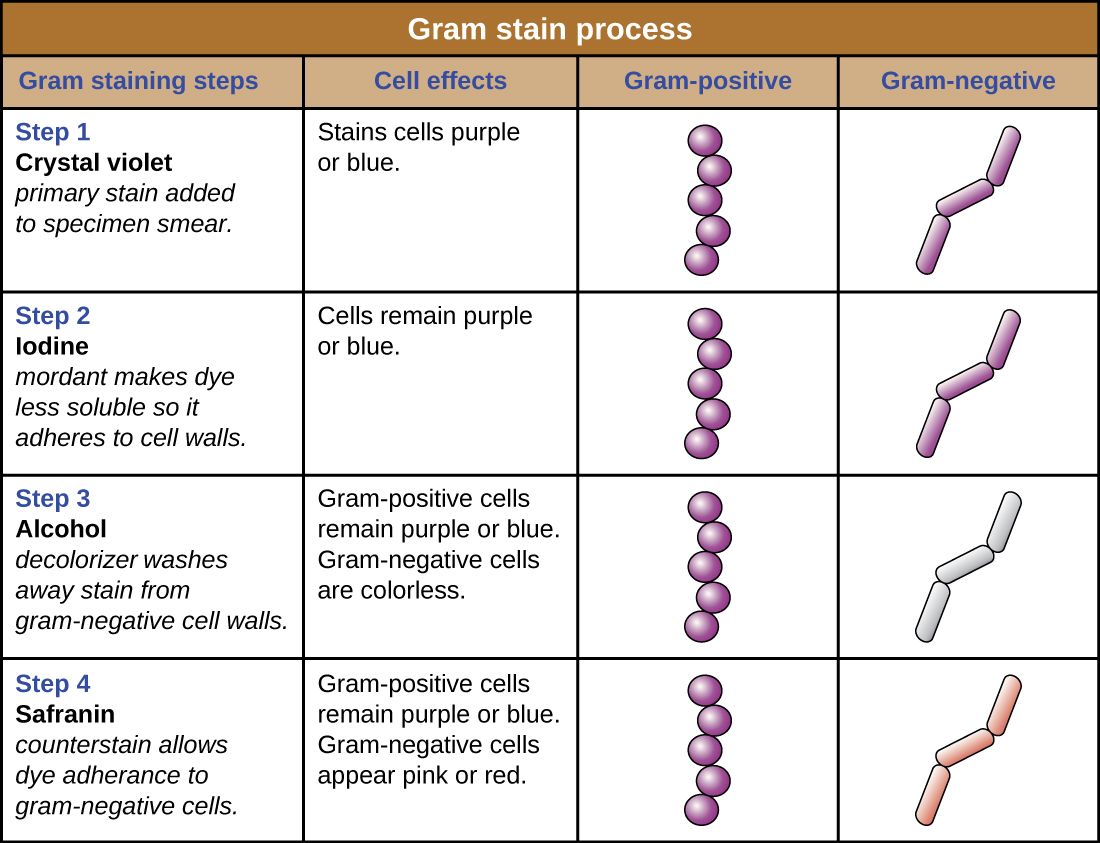
The Gram stain, devised by Hans Christian Gram in 1884, is the single most important stain in clinical microbiology, and it works because of a real difference in the bacterial cell wall. Gram-positive bacteria have a thick outer layer of peptidoglycan, a mesh-like polymer that acts like a sponge. Gram-negative bacteria have only a thin peptidoglycan layer, wrapped by an extra outer membrane. That structural difference is what the four reagents exploit: the thick wall traps the first dye, and the thin one lets it wash out.
The four steps
The sequence is always the same, and every step has a job. First, the primary stain crystal violet floods every cell purple. Second, Gram's iodine acts as a mordant — it binds the crystal violet into a large complex too big to slip out of a thick wall easily. Third comes the decolorizer, alcohol or an alcohol-acetone mix, and this is the step that actually separates the two groups: it dehydrates and tightens the thick Gram-positive wall so the dye complex stays locked in, but it dissolves the Gram-negative outer membrane and washes the dye straight out, leaving those cells colorless. Fourth, the pink counterstain safranin re-colors the now-colorless Gram-negative cells; the Gram-positive cells are already saturated with purple and don't change. The end result: Gram-positive = purple, Gram-negative = pink/red.
| Step | Reagent | Role | Gram-positive | Gram-negative |
|---|---|---|---|---|
| 1 | Crystal violet | Primary stain | Purple | Purple |
| 2 | Gram's iodine | Mordant (traps dye) | Purple | Purple |
| 3 | Alcohol / acetone | Decolorizer (the key step) | Stays purple | Becomes colorless |
| 4 | Safranin | Counterstain | Stays purple | Turns pink/red |
Reading the result at the bedside
A Gram stain can be read in under an hour, long before a culture matures, so it is the first real clue to guide empiric antibiotics while the lab waits 24–48 hours for growth. The report pairs the Gram reaction with the shape and arrangement, and each combination narrows the field: Gram-positive cocci in clusters point to Staphylococcus; Gram-positive cocci in chains point to Streptococcus; Gram-negative rods suggest gut organisms like E. coli; Gram-negative diplococci raise Neisseria. That structural difference also has treatment consequences — the Gram-negative outer membrane blocks some antibiotics and carries endotoxin (Chapter 10), which is why Gram-negative bloodstream infections can be so dangerous.
- The Gram stain sorts bacteria by cell wall: thick peptidoglycan (Gram-positive) vs. thin peptidoglycan plus an outer membrane (Gram-negative).
- Four steps: crystal violet → iodine mordant → alcohol decolorizer → safranin counterstain.
- Decolorization is the make-or-break step that distinguishes the two groups.
- Result: Gram-positive = purple, Gram-negative = pink; read in under an hour, it guides early antibiotic choice.
Section 5From specimen to answer
Collecting and culturing the specimen
Every lab result is only as good as the specimen it started from, and specimen collection is squarely a nursing responsibility. The rules are simple but unforgiving: sample the right site (the infection, not the surrounding skin), collect before antibiotics whenever possible, use the correct container and transport medium, and label it accurately at the bedside. Back in the lab, the sample is spread onto a culture medium — usually a nutrient agar plate (a solid jelly) or a liquid broth. Some media are chosen deliberately: selective media suppress unwanted organisms, and differential media (like blood agar or MacConkey) make different species look visibly different, giving the lab an early hint about what's growing.
The colony: an invisible bug made visible
To isolate a single organism, the lab uses a streak plate, dragging the sample thinner and thinner across the agar until individual cells are separated. Each isolated cell, left overnight in a warm incubator, divides again and again into a visible mound of millions of identical clones — a colony. Because every cell in a colony descends from one parent, a colony is a pure sample to work from. Its morphology — size, shape, color, texture, and whether it destroys the blood in blood agar (hemolysis) — is itself a first clue to the organism's identity. From there, biochemical panels, automated analyzers, or rapid MALDI-TOF mass spectrometry nail down the species.
Sensitivity testing and the antibiogram
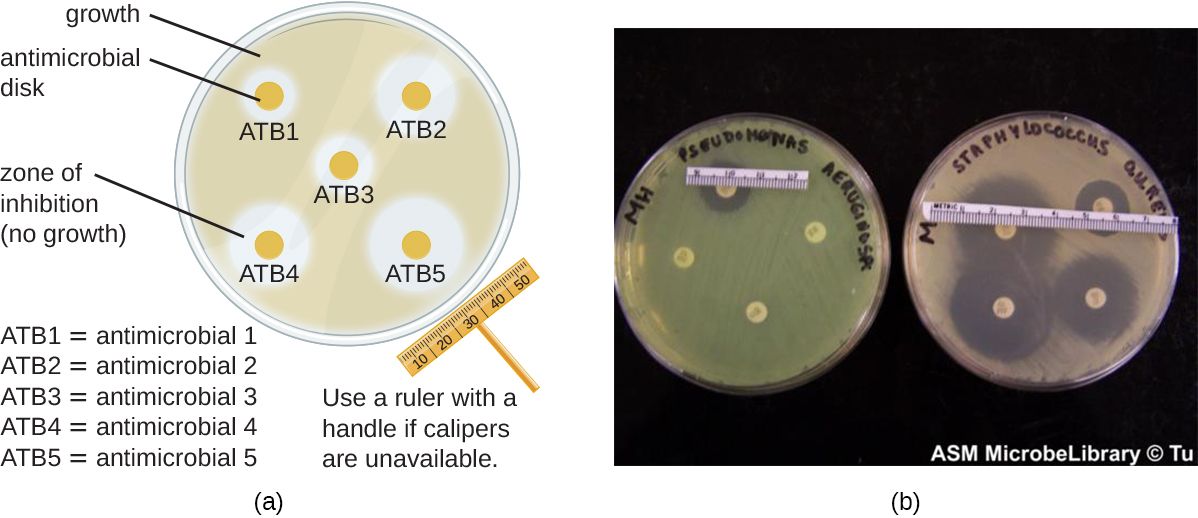
Knowing the organism's name is only half the answer; the clinician also needs to know which antibiotics will kill it. That is sensitivity (or susceptibility) testing. In the classic Kirby-Bauer disk-diffusion method, small paper disks soaked with different antibiotics are placed on a lawn of the organism; where a drug works, it diffuses out and clears a zone of inhibition, and a larger zone generally means the organism is more susceptible to that drug (each zone is measured against standardized breakpoints, not sized up against the neighboring disk). Other methods measure the minimum inhibitory concentration (MIC) — the lowest drug concentration that stops growth — using broth microdilution or a gradient Etest strip. Results come back reported as S, I, or R (susceptible, intermediate, resistant). This is the report that lets the team de-escalate: start broad while waiting, then narrow to the most targeted, effective drug once the sensitivities return.
| Stage | Typical timing | What you learn |
|---|---|---|
| Gram stain | < 1 hour | Gram reaction, shape, arrangement — guides empiric therapy |
| Colony growth | 18–48 hours | Preliminary identity from colony morphology |
| Identification & sensitivity | 48–72 hours | Species and the S/I/R susceptibility report |
- Good results start with good collection: right site, before antibiotics, correct container, accurate label.
- A streak plate isolates single cells; each grows into a pure colony whose morphology hints at identity.
- Sensitivity testing (Kirby-Bauer zones, or an MIC) reports each drug as S/I/R.
- The culture-and-sensitivity report lets the team de-escalate from broad empiric therapy to a targeted drug.
The chapter in one breath
- Microbes are measured in micrometers (bacteria, ~1–3 µm) and nanometers (viruses, ~20–300 nm); the naked eye stops at ~0.1 mm, so microbes are invisible individually.
- The compound light microscope stacks two lenses; total magnification is ocular × objective, reaching 1000× with the oil lens.
- Resolution, not magnification, sets useful detail; light microscopy bottoms out near 0.2 µm, and immersion oil sharpens the 100× image.
- Cells are transparent, so we make a heat-fixed smear and stain it; simple stains show shape, differential stains sort cells into groups, and negative stains color the background.
- The Gram stain's four steps (crystal violet, iodine, alcohol, safranin) exploit the cell wall: Gram-positive = purple, Gram-negative = pink, with decolorization as the key step.
- A specimen becomes an answer through culture, a pure colony, species identification, and sensitivity testing reported as S/I/R.
- Nurses own the front end (proper collection, cultures before antibiotics) and use the culture-and-sensitivity report to advocate for the right drug.
ReferenceWords worth knowing
A quick reference for the terms in this chapter — skim it now, or circle back whenever a word trips you up.
- Acid-fast stain
- A differential stain that identifies organisms with waxy cell walls, such as Mycobacterium tuberculosis, which a Gram stain does not detect well.
- Agar
- A solid gel derived from seaweed, used as the base of culture plates on which microbes are grown.
- Antibiogram
- The report of an organism's antibiotic susceptibilities, listing each drug as susceptible, intermediate, or resistant.
- Colony
- A visible mound of millions of genetically identical cells descended from a single original cell.
- Compound light microscope
- A microscope that uses two lens systems (ocular and objective) in series to magnify a specimen.
- Counterstain
- The second-color dye in a differential stain (safranin in the Gram stain) that recolors the cells the decolorizer has left colorless.
- Culture
- The growth of microorganisms on or in a nutrient medium in the lab.
- Decolorizer
- The alcohol/acetone step of the Gram stain that removes dye from Gram-negative cells while Gram-positive cells retain it.
- Differential stain
- A staining procedure using two or more reagents to distinguish between groups of bacteria (e.g., Gram stain).
- Fixation
- Heat- or chemical-treating a smear to kill the organisms, adhere them to the slide, and preserve their shape before staining.
- Gram stain
- The key differential stain that sorts bacteria into Gram-positive (purple) and Gram-negative (pink) based on cell-wall structure.
- Magnification
- How much larger an image appears than the real object; ocular power multiplied by objective power.
- Micrometer (µm)
- One thousandth of a millimeter; the unit used to measure most bacteria and eukaryotic cells.
- Minimum inhibitory concentration (MIC)
- The lowest concentration of an antibiotic that prevents visible growth of an organism.
- Mordant
- A substance (Gram's iodine) that binds a dye more firmly to the cell, trapping it in the wall.
- Negative staining
- Staining the background with an acidic dye so cells appear clear; avoids heat and preserves capsules and fragile cells.
- Objective lens
- The lens nearest the specimen (4×, 10×, 40×, 100×) that performs the first stage of magnification.
- Oil immersion
- Placing immersion oil between the slide and the 100× lens; the oil's refractive index matches glass, improving resolution.
- Peptidoglycan
- The mesh-like polymer of the bacterial cell wall; thick in Gram-positive cells, thin in Gram-negative cells.
- Resolution
- The smallest distance between two points at which they can still be seen as separate; ~0.2 µm for a light microscope.
- Simple stain
- A stain using a single dye to reveal a cell's size, shape, and arrangement.
- Zone of inhibition
- The clear ring around an antibiotic disk in disk-diffusion testing where the drug has stopped bacterial growth.